“Learning is a torch that will brighten your future!”

Pattern cutting in the fashion industry is the process of taking a design and making it into fabric. Your fineshed pattern would be passed to the pattern grader to resize as required before productin begins.Pattern grading is the process of turning sample size patterns into additional sizes by using a size specification sheet or grading increments. This can be done manually or digitally using a computerised pattern-cutting software.
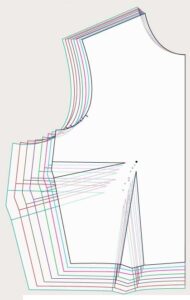
Standard grading rules are based upon ergonomic measurements of the body, mathematically extrapolated or interpolated according to one of numerous pattern making systems. This is often chosen with an eye to the target market for a manufactured garment, in which one system or another prevails, according to consumer taste. Typically, the first pattern is developed in one size and is then graded up or down according to the chosen system, ensuring an optimum fit in all sizes.
However, within the fashion industry, there is no standard garment grading system. Just as there is no standard body type, no standard size specification to fit everyone exists.
Types of Pattern Cutting
1. Draping
2. Manuel Pattern Design
3. Use Own Clothes to Pattern Design
4. Software Pattern Cutting (CAD System)
1. Draping
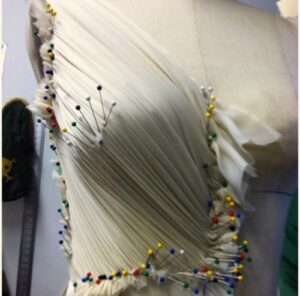 Draping is referred to as creative pattern cutting.In the early days when mankind needed cover for protection and comfort, the only material that could be found for this job was animal skin. People have found different ways to get animal skins into their bodies. As a result, draping was born. This style of clothing lasted for centuries. When the fabric production period started with weaving looms, Greek and Roman cultures went far beyond the first man’s clothing style and used draping for an aesthetic clothing.
Over time, as a result of technological developments such as the development of weaving looms, sewing machines, mold removal techniques, computer support, serial production and standardization has provided the opportunity to dress much easier and cheaper, the draping technique has not lost its importance and necessity.
In today’s fashion, where individuality and difference stand out, preparation of patterns with draping technique comes to the fore in satisfying the tastes of people. In the field of Haute-Couture (bespoke clothing), it is a pleasure to make and apply personalized designs. This method, which requires creativity and labor intensive, is enjoyable as well as lucrative compared to other production methods.
2. Manuel Pattern Design
 It is a basic two-dimensional method in paper pattern preparation. The pattern is prepared on brown paper using the user’s personal measurements. The clothes prepared with this method fully comply with the satisfaction of the user. It is economical to prepare one’s own model. Also, changes in the style can be made by adopting the basic pattern.
3. Use Own Clothes to Pattern Design
 Preferred clothes are removed from the seams, the separated parts are ironed. By spreading the pieces in the direction of stripe line of yarn, putting mujol paper on them, measuring the control with the help of a ruler and a tape measure, the necessary stitches are given, the contours are discarded and the template is prepared.
4. Software Pattern Cutting (CAD System)
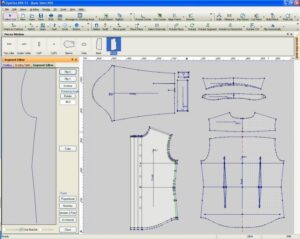 Digital pattern making is fast becoming a popular method of pattern making and is starting to replace manual or paper pattern making. This is simply due to its speed, precision, shareability and space saving abilities. You no longer need a big studio, large table, expensive tools, rolls of paper or storage space for your patterns. With digital pattern making, you can work from your laptop or desktop PC, saving thousands of patterns in folders and files on your computer or memory stick. You can even share them online with your community or send them to friends on the other side of the world in seconds! Not only that, but you can copy and paste full scale patterns without having to spend time tracing them from existing templates. You can add one-click seam allowance without having to draw it by hand. Maybe you want to create your own independent sewing pattern company? Great! With digital pattern making, you can transform your patterns into multi-page PDF printouts – we have a tutorial for that! There are countless benefits to digital pattern making.
Alongside traditional pattern drafting methods, technology is making it easier to produce accurate designs that speed up the production process. This type of software can be used in both small and large-scale textile design for pattern making and grading. Otherwise known as computer-aided design (CAD), this system can work in harmony with several elements across the manufacturing industry.
For design work, brands can transform basic illustrations and sketches into digitized images, which are then printed via garment plotters. The use of innovative software enables businesses to keep up with trends and garment development through intelligent platforms. The changing aspects of the industry make digital pattern creation an invaluable tool for increasing efficiency and productivity.
How to Calculate Inch Fractions
Inch fractions use denominators that are powers of 2 and go up to the 64th of an inch. That means the fraction denominators will be 2, 4, 8, 16, 32, and 64. As a result, converting a decimal to an inch fraction is not as simple as finding the nearest fraction.
Instead, it is necessary to find the nearest fraction with the denominator that is a power of 2, also known as a dyadic fraction or dyadic rational number.[1] Typical inch fractions will look something like 1/64, 1/32, 1/16, 1/8, 1/4, or 1/2. Use our feet and inches calculator to add or subtract feet and inch fractions.
Finding Inch Fractions on a Tape Measure
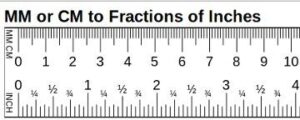 Finding measurements on a ruler or tape measure can be confusing at first, but once you understand how the marks are laid out, then it is far simpler. The markings between the larger inch numbers vary in length.
The longest markings will be the quarter inch markings, ie. the first marking is 1/4 inch, the second is 1/2 (2/4) inch, the third is 3/4 inch.
The next longest markings will be the eighth-inch markings, ie. the first marking is 1/8 inch, the second is 3/8 inch, the third is 5/8 inch, etc.
The next longest markings will be the sixteenth-inch markings, ie. the first marking is 1/16 inch, the second is 3/16 inch, the third is 5/16 inch, etc.